Our downstairs bathroom is very small, and boasts and avocado suite. Glorious.
It also had a useful, but rather ugly, yellowing cream plastic cupboard with mirrored doors in there, and a painting of a boat. Despite our professed love for all things 70s and vintage, this just proved too much, and they had to go.
How do you modernise an avocado bathroom? Well, we've matched ours with a bit of lilac and grey, which I think works a treat, and the hidden shelf above the door means we can store all the stuff we need without it being on show. Much better, and with the bizarre plastic cabinet gone, the room feels bigger too. We swapped it out for an old mirror I had lying around the warehouse...
Friday, 28 November 2014
Thursday, 27 November 2014
We need more space!!
Why is it that a space is so easily filled? We have so much more space than we've had in our previous homes, but we seem to fill it so easily.
I've started to try and find ways to effectively store things, without anywhere looking too cluttered. A challenge.
We started in the kitchen - it's tiny. For two very keen cooks, it's smaller than tiny, it's doll sized. All of my baking equipment (which fills 4 x 64 litre containers) is in the garage, and our herbs and spices alone would fill a cupboard. We considered adding shelving to the wall, but the only available space was immediately in front of you as you walked in, and as we have the door permanently open, you'd see the whole ugly side of it all the time.
I had a few old wine crates at the warehouse, so I brought one home and we painted the inside of it and hung it on the wall to use as a shelf. We bought some super cheap spice racks that we painted in white and hung asymmetrically next to the wine crate, then just kind of hung everything else around those - aprons, chopping boards, shopping bags and the cute plate we bought in Mexico a few years ago that we're too scared to actually use for fear of breaking it.
I like that it's not all matchy-matchy and it breaks up an otherwise bare and boring wall.
Next up.... the bathroom!
Thursday, 6 November 2014
Refurbished nursing chair
When Little Girl was a few weeks old, and I was halfway between basking in the joy of being a new mother and crying my eyes out at the pain of breastfeeding, I decided I needed somewhere more comfortable to sit in, which I could breastfeed her in.
A quick google led me to some rather unattractive, but undeniably practical, nursing chairs that rocked, had reclining backs and came with matching footstools, but at around £150, they were well out of my maternity price bracket. So I found one on Ebay for £30.
Mr went and picked it up and put it together, and I was instantly happier with my special chair. But my goodness, was it ugly!! Beige corduroy on a stained oak rocker - definitely not my cup of tea. I made grand plans to recover it and paint the wood. This was around May 2013.
We moved into a new house in October 2013, and I was still breastfeeding, so putting the chair together was a priority when we moved in. I made a mental note to get cracking on my re-upholstery project as soon as we settled. I spent a while searching for fabrics and getting swatches sent to me, and eventually settled on a beautiful print from Sanderson - it wasn't cheap, but I figured it would look so good that we could keep it for years to come! The fabric sat in its wrapper for a while, and eventually, I made a start.
Having never upholstered anything before, I thought I'd start simply, and do the footstool cushion first. The cushion pad turned out to be a bit rubbish, so I popped into a local haberdashery and bought a new piece of foam to use. I also decided that it would like better as 3 pieces of fabric (top, bottom and sides) rather than 2, which is what it was originally. Also, having suffered a baby with reflux, I knew everything had to be easily removed for washing, so I made a simple pillowcase opening on the back.

The cushion pad looked great, the footstool, however, was still a pretty bland stained oak. I rectified this promptly with a purchase of Annie Sloane chalk paints and wax. It was super simple to use, and I hope you'll agree that the footstool turned out a treat.
At this point, Little Girl had a massive sleep regression and I simply never had time to get on with the chair part of the nursing chair.
.JPG) Eventually, I ordered more foam to replace the seat pad and back cushion on the chair, and recut them to a slightly more elegant, rounded shape, then cracked on with making the new covers. I used the old cushion covers as a guide, and added a few extras - Mr is a whole foot taller than me, so although my head sits comfortably on the back cushion, his rests on the wooden frame - I added a layer of wadding and put it in a simple covering, so that his head is gently cushioned on those nights where we spend a few hours cuddling Little Girl to sleep. I then had to add a couple of poppers to the underside of that cushion to keep it from flicking up - simple enough.
Eventually, I ordered more foam to replace the seat pad and back cushion on the chair, and recut them to a slightly more elegant, rounded shape, then cracked on with making the new covers. I used the old cushion covers as a guide, and added a few extras - Mr is a whole foot taller than me, so although my head sits comfortably on the back cushion, his rests on the wooden frame - I added a layer of wadding and put it in a simple covering, so that his head is gently cushioned on those nights where we spend a few hours cuddling Little Girl to sleep. I then had to add a couple of poppers to the underside of that cushion to keep it from flicking up - simple enough.
Really chuffed with the end result, and even managed to get it done before Little Baby arrives.
A quick google led me to some rather unattractive, but undeniably practical, nursing chairs that rocked, had reclining backs and came with matching footstools, but at around £150, they were well out of my maternity price bracket. So I found one on Ebay for £30.
Mr went and picked it up and put it together, and I was instantly happier with my special chair. But my goodness, was it ugly!! Beige corduroy on a stained oak rocker - definitely not my cup of tea. I made grand plans to recover it and paint the wood. This was around May 2013.
We moved into a new house in October 2013, and I was still breastfeeding, so putting the chair together was a priority when we moved in. I made a mental note to get cracking on my re-upholstery project as soon as we settled. I spent a while searching for fabrics and getting swatches sent to me, and eventually settled on a beautiful print from Sanderson - it wasn't cheap, but I figured it would look so good that we could keep it for years to come! The fabric sat in its wrapper for a while, and eventually, I made a start.
Having never upholstered anything before, I thought I'd start simply, and do the footstool cushion first. The cushion pad turned out to be a bit rubbish, so I popped into a local haberdashery and bought a new piece of foam to use. I also decided that it would like better as 3 pieces of fabric (top, bottom and sides) rather than 2, which is what it was originally. Also, having suffered a baby with reflux, I knew everything had to be easily removed for washing, so I made a simple pillowcase opening on the back.
The cushion pad looked great, the footstool, however, was still a pretty bland stained oak. I rectified this promptly with a purchase of Annie Sloane chalk paints and wax. It was super simple to use, and I hope you'll agree that the footstool turned out a treat.
At this point, Little Girl had a massive sleep regression and I simply never had time to get on with the chair part of the nursing chair.
Eventually, I ordered more foam to replace the seat pad and back cushion on the chair, and recut them to a slightly more elegant, rounded shape, then cracked on with making the new covers. I used the old cushion covers as a guide, and added a few extras - Mr is a whole foot taller than me, so although my head sits comfortably on the back cushion, his rests on the wooden frame - I added a layer of wadding and put it in a simple covering, so that his head is gently cushioned on those nights where we spend a few hours cuddling Little Girl to sleep. I then had to add a couple of poppers to the underside of that cushion to keep it from flicking up - simple enough.Really chuffed with the end result, and even managed to get it done before Little Baby arrives.
Monday, 27 October 2014
A changing mat
Has anyone else noticed that the portable changing mats you buy are somewhat on the small side? Great for a newborn, but once you get to 6 months, all that fits on there is half a bum cheek. Not ideal for any poo-splosions....
I needed a new one, and nothing much ever seemed to be available, so making one was the solution!
I bought some waterproof fabric in a colourful print, put a layer of old fleece (to absorb any accidents, and make it bit softer on Little Girl's back) in the middle, and sewed it together with a bit of brightly coloured bias binding. Lovely.
And it rolls up to a tiny size, so fits in our pacapod without any problems.
Wednesday, 5 March 2014
Nursery curtains
Making curtains - a simple task, right? Hmm. Not for me. This was a tricky one.
I figured I'd pick some adorable fabric, cut it, hem it, and add some eyelets and breathe in the "oohs" and "aahs" from my friends and family as they fell in love with my masterpieces. This is clearly not the case.
It took 4 hours to measure, turn up, and iron the hems. I did each hem 3 times. The first was measured, pinned, then ironed. And then I realised that the pattern wasn't level. So I redid it by eye, making sure the pattern looked awesome all the way around. But it hung crooked. So I did it again with a measuring tape.
I figured I'd pick some adorable fabric, cut it, hem it, and add some eyelets and breathe in the "oohs" and "aahs" from my friends and family as they fell in love with my masterpieces. This is clearly not the case.
 |
| Step One - Pour a glass of wine. |
Lesson learned. A measuring tape is better than my 20/20 vision. Gah!
Sunday, 2 March 2014
70s chest of drawers
We've been on the lookout for a piece of furniture for our daughter's room for a little while, and we recently stumbled upon a huge second hand furniture store in Dunstable. It's a charity store raising funds for the British Heart Foundation, and it seems a great concept - they offer to collect any unwanted furniture free of charge, and they sell on anything that's of good enough quality. It's a great way to get your house cleared if you're moving and don't have the means to get furniture to the the tip yourself. Plus the charity makes money from the sales, and people like dear Husband and I, who much prefer older furniture, get the opportunity to kit out our house for a few pennies.

 So we found this really cute chest of drawers, with the cone shaped legs that we seem to have a real fetish for at the moment, and it was reduced. Unable to resist a bargain, we paid for it, (and a pink neon strip light that we just *had* to have) and said we'd bring the car round to pick it up.
I'd completely forgotten that we had dear Daughter with us. Which meant we had the world's biggest buggy in the boot. Ooops. We managed to squeeze it all in by shifting dear Daughter to the front seat, unscrewing the legs on the chest, and I did a little yoga move to sit beside it on the back seat. Hoorah!
With a piece of furniture on our hands, we were invincible, so now was obviously the right time to do up the nursery. I went out to buy the paint and came home with a delicious turquoise, which turned out to be teal once it dried, and a tub of mustard yellow (which has yet to be designated a room). Dear Husband painted the wall behind the cot, and applied some cute vinyl stickers to the opposite wall, and hey, presto! We have the start of a really cute nursery!
Having painted our girl's room blue (albeit only one wall, and it is teal, which is better than just a shade of blue), we figured we could get away with some pink without it looking too twee. So I set out to find something to paint the chests with. I found a great little range from Dulux called 'made by me'. The name irritates me, but the colours were nice, and as it turns out, dead easy to apply and they have a really nice finish.
So I stripped off the drawer handles (how cute are they?!), cleaned out the drawers - they had some kitsch flowery drawer liners in them, as well as a fair bit of dust. And on lifting out the middle liner, came across some blueprints from 1982. (I'm saving these, I'm sure I can use them for some other project - Bonus!)


Not a fan of spending time on prep, I gave it a really quick sanding down, a clean with sugar spray, and primed it with some wood primer we had left over. I got a bit frustrated here, because the primer had dried out a little, so was a bit too thick really, but it did the job, and I refuse to buy anything I don't have to.
It already looks cute just in white...

The next day I gave the unit a coat of pink paint using a mini gloss roller, and thought a light grey on the drawer fronts would stop it from looking too twee. I'm so glad I did that, I think an all pink chest would have made me feel a bit nauseous.

I could have gotten away with just a single coat of paint, but I gave it a second the following day to make it look super crisp.

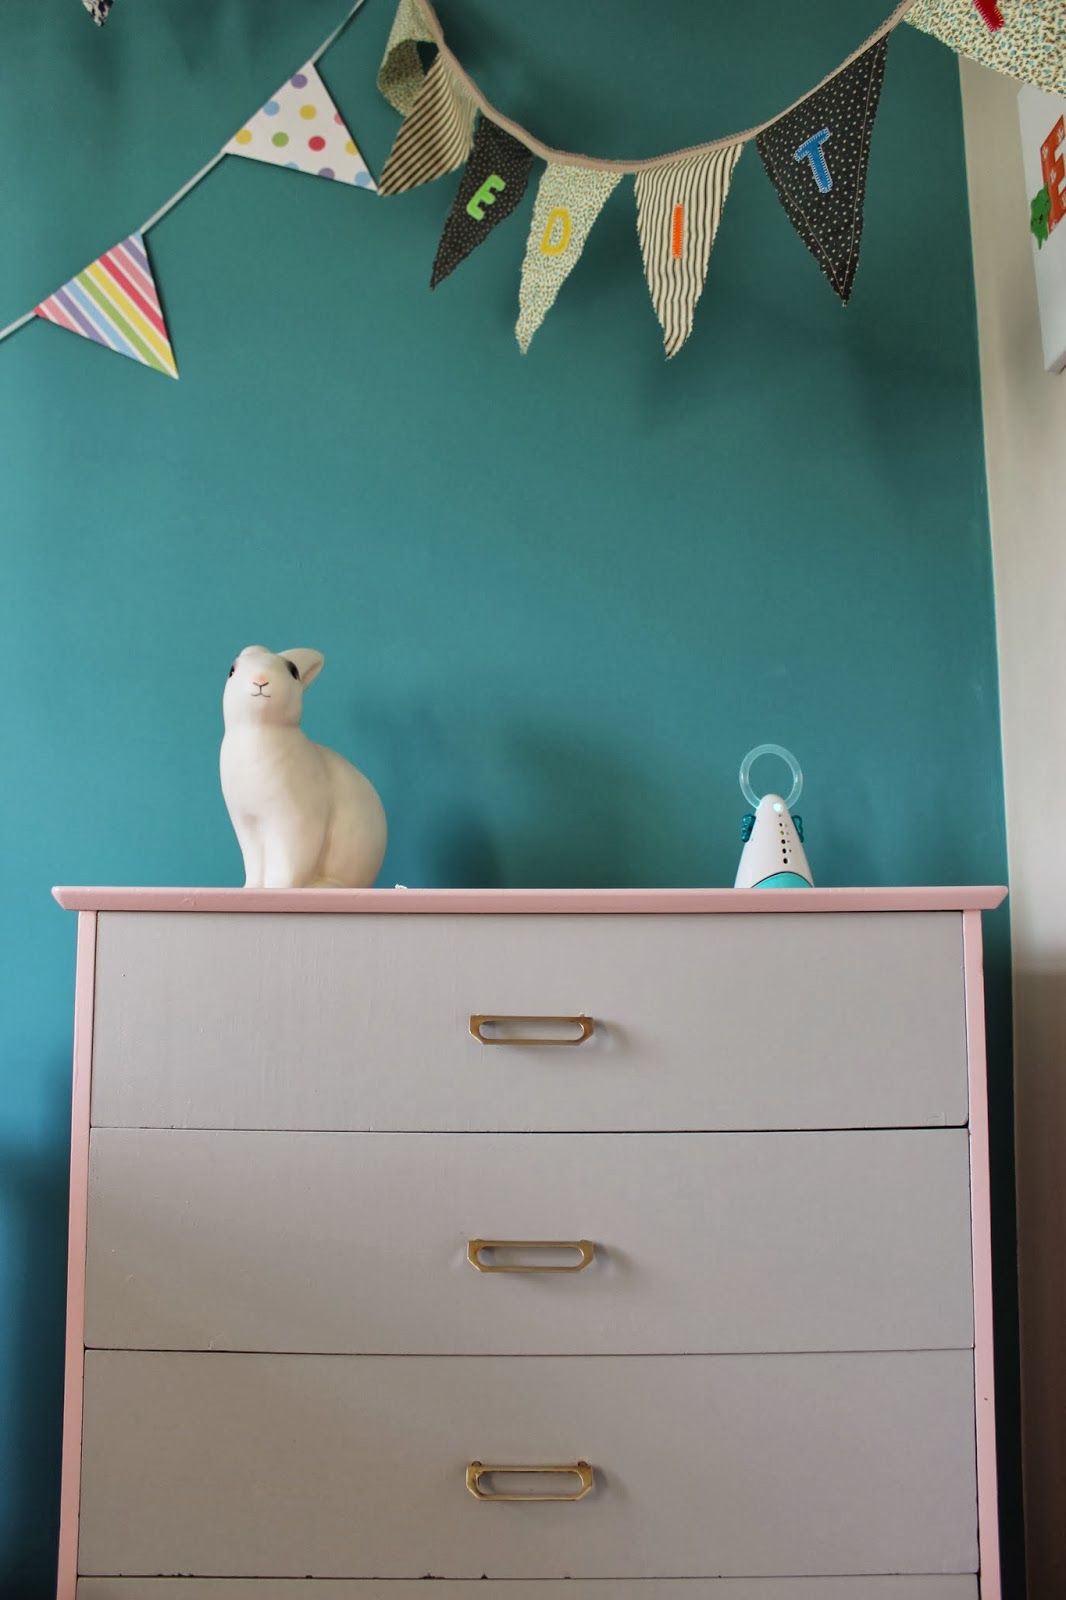
A quick polish of the handles, and it looks fab. I think it really sets off the teal of the wall nicely.
Very happy with this one.
So we found this really cute chest of drawers, with the cone shaped legs that we seem to have a real fetish for at the moment, and it was reduced. Unable to resist a bargain, we paid for it, (and a pink neon strip light that we just *had* to have) and said we'd bring the car round to pick it up.I'd completely forgotten that we had dear Daughter with us. Which meant we had the world's biggest buggy in the boot. Ooops. We managed to squeeze it all in by shifting dear Daughter to the front seat, unscrewing the legs on the chest, and I did a little yoga move to sit beside it on the back seat. Hoorah!
With a piece of furniture on our hands, we were invincible, so now was obviously the right time to do up the nursery. I went out to buy the paint and came home with a delicious turquoise, which turned out to be teal once it dried, and a tub of mustard yellow (which has yet to be designated a room). Dear Husband painted the wall behind the cot, and applied some cute vinyl stickers to the opposite wall, and hey, presto! We have the start of a really cute nursery!
Having painted our girl's room blue (albeit only one wall, and it is teal, which is better than just a shade of blue), we figured we could get away with some pink without it looking too twee. So I set out to find something to paint the chests with. I found a great little range from Dulux called 'made by me'. The name irritates me, but the colours were nice, and as it turns out, dead easy to apply and they have a really nice finish.
So I stripped off the drawer handles (how cute are they?!), cleaned out the drawers - they had some kitsch flowery drawer liners in them, as well as a fair bit of dust. And on lifting out the middle liner, came across some blueprints from 1982. (I'm saving these, I'm sure I can use them for some other project - Bonus!)
Not a fan of spending time on prep, I gave it a really quick sanding down, a clean with sugar spray, and primed it with some wood primer we had left over. I got a bit frustrated here, because the primer had dried out a little, so was a bit too thick really, but it did the job, and I refuse to buy anything I don't have to.
It already looks cute just in white...
The next day I gave the unit a coat of pink paint using a mini gloss roller, and thought a light grey on the drawer fronts would stop it from looking too twee. I'm so glad I did that, I think an all pink chest would have made me feel a bit nauseous.
I could have gotten away with just a single coat of paint, but I gave it a second the following day to make it look super crisp.
A quick polish of the handles, and it looks fab. I think it really sets off the teal of the wall nicely.
Very happy with this one.
Thursday, 20 February 2014
Vintage record cabinet
Around a month before I was due to give birth, I stopped work, and immediately panicked about getting bored. A chap I'd met through a mutual friend had opened a cafe inside a vintage store in Crystal Palace, and was after some coffee brewers, so I offered to add some onto my order, and drop them into him sometime soon after. It was to be the last work related thing I did for a while! I took advantage to look around the store and promptly spent all the money he gave me for the brewers on this cute record cabinet.
We needed a side table to go next to our 70s-esque woollen felt sofa, and this would double up well to hide all the trail of paperwork I seem to leave everywhere I go. It was a bit scuffed, but in great condition otherwise, and someone had clearly loved storing their records in it at some point in its lifetime; it didn't really go with any of our furniture, but I had four weeks to figure out how to make it fit.

Or so I thought. Our daughter was born a few days later.
Fast forward 11 months, and I've finally found the time to do it up. I wasn't really too sure where to start, but I felt it needed an injection of colour, so I went to my local DIY store and browsed the spray paints.
A (really) quick rub down with some sandpaper, after removing the legs and the doors, followed by a quick blast of primer (sheesh! spray paint gets EVERYWHERE on a windy day) and it was ready for some colour.
The cabinet has this non-slip vinyl sheet glued to the top of it, and I wasn't feeling up to scraping that off, so that stayed black; the inside became bright orange, the outside a gunmetal grey and the doors and legs became taupe. (which everyone seems to call 'warm grey' at the moment....)
It looks awesome, and the little bit of orange that is still visible when the doors are shut is just the right amount of colour pop to brighten up the cabinet.
Once it was in place, I gave the handles a little polish with some brass cleaner, and it's better than new.

Not bad for a 2 day turnaround.
We needed a side table to go next to our 70s-esque woollen felt sofa, and this would double up well to hide all the trail of paperwork I seem to leave everywhere I go. It was a bit scuffed, but in great condition otherwise, and someone had clearly loved storing their records in it at some point in its lifetime; it didn't really go with any of our furniture, but I had four weeks to figure out how to make it fit.
Or so I thought. Our daughter was born a few days later.
Fast forward 11 months, and I've finally found the time to do it up. I wasn't really too sure where to start, but I felt it needed an injection of colour, so I went to my local DIY store and browsed the spray paints.
A (really) quick rub down with some sandpaper, after removing the legs and the doors, followed by a quick blast of primer (sheesh! spray paint gets EVERYWHERE on a windy day) and it was ready for some colour.
The cabinet has this non-slip vinyl sheet glued to the top of it, and I wasn't feeling up to scraping that off, so that stayed black; the inside became bright orange, the outside a gunmetal grey and the doors and legs became taupe. (which everyone seems to call 'warm grey' at the moment....)
It looks awesome, and the little bit of orange that is still visible when the doors are shut is just the right amount of colour pop to brighten up the cabinet.
Once it was in place, I gave the handles a little polish with some brass cleaner, and it's better than new.
Not bad for a 2 day turnaround.
Saturday, 15 February 2014
Dining chair
 I was in Paris for work, very briefly, a few days ago, and fell across an awesome vintage furniture and bric-a-brac store. Because I was working, I had the van with me, so I could fit bulky bits in with me and bring them home. It's always a bit daunting, because I like to get Dear Husband's approval when adding furniture to our home. But lack of wifi, and zero phone signal meant I was left to make the decision on whether or not to buy the 15 euro dining chair. A little negotiating got it down to 8, which is about a fiver in gbp, making it too much of a bargain to resist, and so off I went to figure out where I'd parked the van....
It looks super cute back home, and doubles up as a great support for Dear Daughter to practice standing up and balancing on two legs with. Practical and a learning aid for the little one. Double bargain.
Subscribe to:
Posts (Atom)